
You will notice a bracing bar on the top and middle of the box (NOT the hanging bar), there is another at the bottom (see the pine wood strips, the middle one being the most obvious). The top and bottom ones were really great to pull the box together as without these the lid and floor would have bowed a bit. I mostly used panel pins to nail it together but used screws on the sections with the bracing to really secure the box.
As you can see from the pictures below its fairly sizable. You could achieve similar (large or small) by buying a cheap cabinet from a pine furniture store or somewhere like Ikea.


The design of this box is based on air flow, regardless of the fact you see globes, and you will notice that there are no massive holes to achieve this, making huge holes creates a challenge to find a suitable fly filter and you will probably find that the air flow isn't great. Holes can always be made bigger later!
I based the size of the side holes on the cabinet air vent I could source (Caravan supplier on eBay for ventilated cabinet fitting). To make the holes the best option is a hole saw used on a drill. I made the side holes roughly in the area aligned either side of center of the hanging meat. This will create airflow across the meat which is what dries it!
On the roof I looked at using a 220v (US is 110v) fan but the cost was high as these were sunbed fans. So instead I opted for a 12v fan used for computer cooling. I sourced this from China on eBay again as well as the really cool filter covers. This fan is a 120mm PC case fan and cover (Hole saw this size is expensive so if you have a jigsaw it may be best or see if a mate has one).
You will see the 12v transformer, the same ones you use for down lighting etc. These components are much cheaper than the 220v ones I looked at and buying two would not be a bad thing for spares!
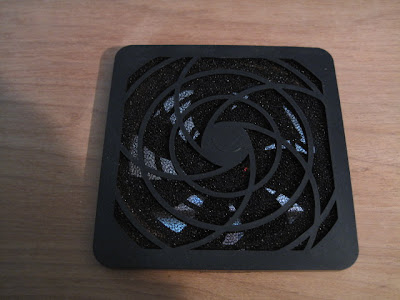

These shots show a close up of the vents (about 80mm in size) and placement. I also used the cut outs from the vent holes as the brace for the dowel rod to hold the Biltong, you can quite easily just attach using a screw or bracket. When the door is closed and the Biltong maker on you should have a decent enough airflow to hold a small piece of paper or plastic onto the vent hole on the outside. Note the fan blows OUT the Biltong box NOT IN!


Lastly you will see I do use lights, for me this has some advantages but not essential to the drying of the Biltong, unless you have a humid climate then its essential. Firstly I can see what I am doing when working in the Biltong box in the dark garage. Secondly the heat from these 100W globes (60W works or halogens) does take the cold edge off during winter, don't need the meat freezing! Lastly it does dry the Biltong closest to the lights a wee bit faster so I tend to move the meat around depending on the drying rate and bring wetter pieces closer to the lights or vents, depending where you seeing the best Biltong drying results.
I tend to check on a 12 hourly cycle after the first 24 hours, morning and night basically, and move pieces as necessary. Sometimes you can also turn the meat around if you need the wetter top part to dry, the hooks pass through the Biltong fairly easily. Speaking of which I simply used plastic coated garden wire but ideally stainless hooks are best.
The lights have a really snazzy cover made from beer cans, what more can I say.... This can be made from tin or beer cans. Just take care when cutting and bending the sharp edges and even latex gloves will help keep any cuts at bay. If you attempt this just do it slowly and carefully.
I was really lucky and got a sheet of aluminium that I used to create a drip tray. Alternatives to a drip tray include using epoxy based paints or sealer that can be applied to create a waterproof base (CHECK with the hardware store on suitability\toxicity for this application). Last thing you want is drippings all over your Biltong box, unsightly and probably not too healthy.


Very nice Clinton! You've inspired me to make one. Maybe a bit smaller though, and I don't think I need the lights in Queensland
ReplyDeleteVery Professional
ReplyDeleteCraig you may need the light as Queensland is very humid, you will need to ensure that the air is dry and the light achieves this.
ReplyDeleteGoogle Images of Data Cabinets and you will see an instant Biltong box with vent holes.Just add 100w globe and fan!
ReplyDeleteThis is an idea in theory but have not tried it yet.
The question I have is do you need the fan? I have read differing opinions, some say yes some say no and does it blow air in the box or suck it out?
Hi, the data cabinet may work but you must consider that its the airflow that dries the meat. The lights create a convection flow of air so yes no real need for a fan although I prefer the combination of the two. The fan blows out, therefore sucking air into the box and over the meat. You would need to make sure that the number of holes does not affect airflow over the meat by following the path of least resistance, potentially not drying the meat properly.
ReplyDeleteHow did you wire the fan and the bulbs together could you provide some detail on the electrics for those who are of the inferior knowledge. But this looks like a great rig
ReplyDeleteHi Jason, I will have to look at this for you. May take a little while but will get to it.
ReplyDeleteHi Jason,
ReplyDeletePower diagram added to the Blog entry
Cheers
Great guide, thanks Clinton! I'm thinking of doing this to a cupboard to dry my clothes. Incandescent globes are harder to get these days, but for drying clothes the air movement is probably enough.
ReplyDeletejust about to make a biltong box but I am making a minor adjustment, by using a 100w ceramic heat bulb instead of a light bulb. i bought this one: AC 220-240V 100W Ceramic Emitter Heater Pet Reptile Heat Lamp Bulb Black
ReplyDeleteWill let you know how it goes!
I have built a biltong box for a friend, but rather than the smaller air holes I have made larger openings and my friend uses an external fan to blow are through.
ReplyDeleteAdrian
Mind if i ask where you got the tray from. Bunnings (australia) hasnt got anything like it - cheers
ReplyDeleteHi, I made it myself out of flat aluminium sheeting. Alternatively find something that works and then build the box around those dimensions? You could just epoxy or paint the bottom for easy cleaning. I also use cat sand, or you could use cleaned builders sand to catch the drippings. Little more difficult to clean though.
DeleteHI , Must the wiring for the light pass through the transformer as well ?
ReplyDeletehi do you have a link to the wire splitter you are using as I cant see it well in the picture and I cant find anything in my local bunnnigs (Australia) as the guys in the department know less then me. please reply to my email pugdog0@hotmail.com if you can
ReplyDeletethanks
Yeah Bunnings have no idea. Jaycar might otherwise Ideal would have, not sure if they are in your area.
DeleteYou want a chocolate block, see images here.
https://www.google.com.au/search?q=electrical+chocolate+block
Hi Clinton,Greetings from darkest Cornwall,would it be possible to get some measurements in inches for the box please,I have just made one box from a 80 litre Plastic storage bin and have added a 60 Watt bulb and three 120mm fans,one to blow in one blowing out and one on standby in case of breakdown,Holes along both sides and on the end opposite the Light,all covered with Modelling Mesh which is very cheap and works great as well as easy to cut with scissors,if this works out okay I will then upgrade to a wooden box as just by chance I have found hiding in my workshop three pieces of 8 x 4 6 ply,so that will do nicely,anyway all I need is the measurements and I can transfer that to paper and plan it all out,so I am hoping you will be able to supply the info.
ReplyDeleteWill be starting to get ready for the first batch of Biltong soon so it will give me something to do when it is curing,also bought a Von Shef Dehydrator,6 shelves,was going to buy one from Amazon till I saw the price,£37-£43 excluding Postage,but just by chance I logged onto a site and Wahay,there was the same Dehydrator and it was £20 49p including Postage no brainer there and it arrived a few days ago,thats for the Beef Jerky and it also does Fruit and Veg as well,winner.
Anyway get in touch if you would and I can keep in touch with you and let you know How I get on,All the Best Mate,Happy Tonging,Mike bennett.
Nice, good innovation there!
DeleteHave you looked at this post in terms of measurements?
http://biltongstuff.blogspot.com.au/2011/01/biltong-box-building-instructions.html